DIY TURF INSTALLATION
DIY Installation
Request a FREE on-site, artificial grass consultation.
Here at Plush Grass, we wholeheartedly believe that a lush, green lawn should be enjoyed without all the hard work that comes with it. That’s why we offer DIY installation services for our top-tier artificial turf in Denver, CO. With our DIY installation process, you can save money and enjoy all the benefits of synthetic turf without all the hassle.
Sturdy & Safe
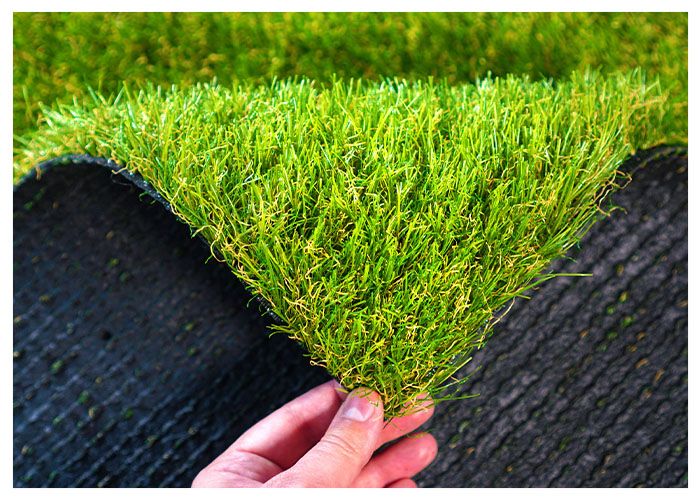
Our synthetic turf is made of sturdy, safe, and resilient material designed to withstand any weather condition and remain green and luscious all year round. With easy-to-follow instructions and world-class customer support, you can count on Plush Grass for a turf that looks great, feels good, and lasts beyond your expectations.
RESILIENT AND LONG-LASTING
Our synthetic turf is engineered to endure extreme conditions such as heavy foot traffic, intense sunshine, and harsh weather conditions. The turf fibers are made of the finest quality materials, making them crush-proof, resistant to fading and discoloration, and safe for pets and children.
COST-EFFECTIVE
Choosing Plush Grass for your DIY installation needs is undoubtedly a cost-effective choice in the long run. You’ll save a significant amount of money by avoiding regular maintenance and water bills. Plus, with our bug-resistant turf, you’ll never have to spend money on pest control.
READY TO INSTALL
OVERVIEW ARTIFICIAL TURF INSTALLATION
Materials and Equipment Needed:
Shovel, wheelbarrow, landscaping rake, seam tape, razor knife, 6” spikes, hammer, stiff bristled nylon broom, Envirofill infill, fertilizer spreader/broadcaster, tamper or water roller, water-filled spray bottle (optional).
- Clear your site of all vegetation and organic material. You want to start from clean dirt that is that is relatively smooth and free from large clumps. Rent a sod cutter machine if you have a large area to remove.
- Spread gray breeze (also known as crusher fines and 3/8 minus crushed granite) to a depth of 3” to 5″ using a landscape rake. Once the breeze is spread evenly use the flat edge of the landscape rake to smooth and grade the area. If your grass will be next to a sidewalk or another border be sure that the grass will extend above the border to your desired height. Next, use a tamper or a water roller to compact the breeze so that it is stable to walk on.
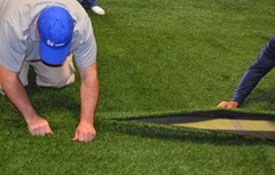
- Lay your grass over the breeze making sure that the grass meets or extends past your desired border. If you are seaming two pieces of grass together make sure that the “grain” of the two pieces of grass are going in the same direction.
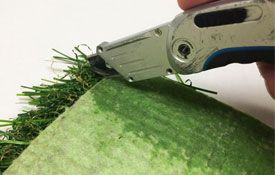
- When seaming pieces of grass together you will need to cut the starter strips off the edges of your grass pieces with a razor knife/utility blade. Do this by cutting along the 2nd stitch line in from the starter strip. Some find it easier to find the stitch line by spraying the back of the grass with water. Once the edges are cut place the pieces of grass tightly next to each other so that there are no gaps. Next, roll back the two pieces of grass and center your self-adhesive seam tape in the middle of the seam tape where the two pieces of grass will meet. Then slowly place one piece of grass on to the seam tape by starting at one end and slowly pressing the grass on to the tape. Next, repeat the process with the other piece of grass making sure to keep your blades of grass from folding into the seaming area.
- Trim the edges of the grass to fit your area by using your razor knife. Fold back your grass until it meets your border and then cut it along the backing of the grass. Do this slowly every foot or so.
- Hammer in your spikes along the perimeter of the grass about an inch from the edge of the grass. Do this every foot or so along the perimeter of your grass. Be sure not to hammer down any blades of grass by getting your spike hammered 2/3 of the way down and then using another spike in your other hand to keep blades of grass away as you finish hammering.
- Grab your STIFF BRISTLED NYLON BROOM and push against the grain of the grass until the blades are standing upright. Make sure to keep one hand in front of you and the end of the broom next to your hip so that you don’t accidentally poke yourself in the stomach with the end of the broom handle.
- Once the blades of grass are upright fill the fertilizer spreader with the Envirofill infill and follow a similar pattern to mowing a lawn. After each pass make sure to brush the infill into the grass. Repeat this process until there are no more bags of infill left. You should have approximately 1 – 1.5 lbs. of infill per square foot. Next, brush the grass again until the infill is spread evenly and the all the blades of grass are standing upright.
- MAINTENANCE: In the Autumn make sure to use a leaf blower to remove fallen leaves instead of a rake. Raking leaves on artificial grass will cause the leaves to break apart and create pockets of organic material that may begin to grow plants or weeds.